VirtualBox Mac opens up a world of possibilities for Mac users! Want to run Windows, Linux, or even another instance of macOS all within your existing system? This guide dives into everything you need to know, from installation and VM creation to advanced features like snapshots and shared folders. We’ll cover the basics, tackle common issues, and even explore some performance tweaks to keep things running smoothly.
Get ready to unlock the power of virtualization on your Mac!
We’ll walk you through setting up VirtualBox, creating and configuring virtual machines, and optimizing performance. We’ll also explore advanced topics like networking configurations, USB passthrough, and security best practices. Whether you’re a complete newbie or have some virtualization experience, this guide will equip you with the knowledge to master VirtualBox on your Mac.
VirtualBox Mac Installation Process
Installing VirtualBox on macOS is generally straightforward, but understanding the process and potential pitfalls can save you time and frustration. This section details the installation steps, compares installation methods, and addresses common problems.
The primary installation method involves downloading a .dmg file from the official Oracle VirtualBox website. This file contains the VirtualBox application and necessary components. Alternatively, some users might opt for package managers, although this is less common for VirtualBox.
Installation Steps Using the .dmg File
The .dmg file provides a user-friendly installation experience. Here’s a step-by-step guide:
- Download the latest VirtualBox .dmg file for macOS from the official Oracle VirtualBox website. Ensure you download the correct version for your macOS version.
- Once the download is complete, locate the .dmg file in your Downloads folder (or wherever you saved it).
- Double-click the .dmg file. This will mount it as a disk image.
- The mounted disk image will contain the VirtualBox application. Drag and drop the VirtualBox application icon into your Applications folder.
- Once the application is in your Applications folder, you can launch it by double-clicking the icon. You may need to confirm that you want to open the application from an unidentified developer.
- Follow the on-screen prompts to complete the installation. This usually involves accepting the license agreement and choosing installation options.
Illustrative Screenshot (Description): Imagine a screenshot showing the Finder window with the mounted .dmg file displayed. A VirtualBox icon would be clearly visible within the .dmg window. Another screenshot would depict the progress bar during the installation process, showing the percentage of completion. A final screenshot would show the VirtualBox application successfully launched and ready to use.
Comparison of Installation Methods
While the .dmg file is the most common method, understanding the alternatives can be helpful.
| Installation Method | Pros | Cons |
|---|---|---|
| .dmg file (Direct Download) | Simple, straightforward process; directly from the official source; ensures you get the latest version. | Requires manual download and installation; may require additional steps for updates. |
| Package Manager (e.g., Homebrew) | Automated updates; potentially easier management of dependencies. | Requires familiarity with the command line; may not always have the absolute latest version. |
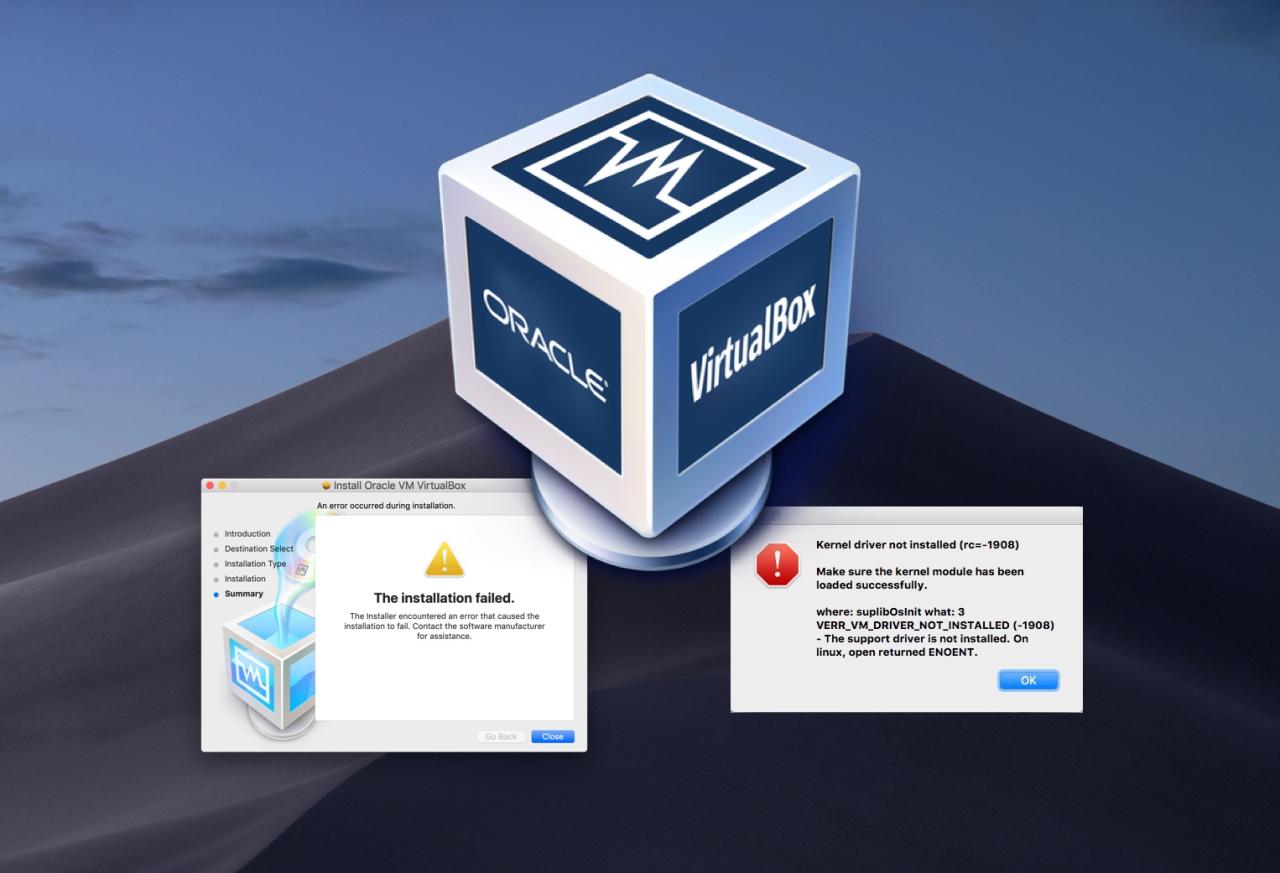
Troubleshooting Common Installation Errors
Several issues might arise during VirtualBox installation. Understanding these common problems and their solutions is crucial.
- Kernel Extension Loading Failure: This often occurs due to macOS security settings. The solution usually involves temporarily disabling System Integrity Protection (SIP) or adjusting security settings to allow the VirtualBox kernel extensions to load. This requires restarting your Mac.
- Insufficient Disk Space: VirtualBox requires significant disk space, especially for virtual machines. Ensure you have enough free space before attempting installation.
- Permissions Issues: If you encounter permissions errors, try running the installer with administrator privileges. This often involves right-clicking the installer and selecting “Open With” and then choosing an appropriate application with admin privileges.
- Download Errors: If the .dmg file fails to download correctly, try downloading it again. Ensure a stable internet connection.
Virtual Machine Creation within VirtualBox on Mac

So, you’ve got VirtualBox installed – awesome! Now it’s time to create your first virtual machine (VM). Think of it like building a tiny, completely customizable computer inside your Mac. This lets you run different operating systems without affecting your main macOS installation. It’s super useful for testing software, exploring different OSes, or even just having a safe sandbox for experimenting.Creating a VM in VirtualBox is pretty straightforward, but getting the resource allocation right is key to a smooth experience.
Too little RAM, and your VM will crawl. Too few CPU cores, and it’ll be sluggish. We’ll walk through the process step-by-step, and cover some best practices to make sure your virtual machine runs like a dream.
Creating a New Virtual Machine
To start, launch VirtualBox. You’ll see a “New” button; click it. A wizard will guide you through the process. First, you’ll name your VM (e.g., “Windows11VM,” “UbuntuTest”). Then, choose the type (the guest OS) and version.
For example, if you’re installing Windows 11, select “Microsoft Windows” and then “Windows 11 (64-bit)”. VirtualBox will automatically select the appropriate settings, but we’ll customize those in the next step.
Allocating Resources
Next, you’ll allocate resources. This is where you decide how much of your Mac’s RAM, CPU cores, and hard drive space your VM will use. The amount you allocate will depend on your Mac’s specs and the demands of the guest OS. As a general guideline:
- RAM: Allocate at least 4GB of RAM, but more is better. If your Mac has 16GB, you could allocate 8GB to a VM running a demanding OS like Windows 11. Keep in mind that your Mac will still need RAM for its own processes, so don’t allocate more than half of your total RAM to the VM.
- CPU Cores: Allocate at least 2 CPU cores. Again, more is better for performance, especially if you’re running resource-intensive applications within the VM. You can allocate a portion of your CPU cores (e.g., 2 out of 8).
- Hard Drive Space: This depends on the OS and applications you plan to install. For a Windows 11 installation, start with at least 60GB, but 100GB or more is recommended if you plan on installing many programs.
Remember, these are guidelines. Experiment and adjust based on your experience. If your VM runs slowly, try increasing the RAM or CPU core allocation.
Guest Operating System Examples
VirtualBox supports a wide variety of guest operating systems. Some popular choices include:
- Windows 10/11: Perfect for running Windows-only applications or testing Windows software.
- Various Linux Distributions (Ubuntu, Fedora, Debian): Excellent for software development, server testing, or exploring different Linux environments.
- macOS (limited): While you can technically run older versions of macOS, it’s generally not recommended due to licensing restrictions and potential compatibility issues.
You’ll need an ISO image file of your chosen OS to install it within the VM. You can download these from the official websites of the respective operating systems.
Optimizing Virtual Machine Performance
Several strategies can boost your VM’s performance.
- Enable Hardware Virtualization (Intel VT-x/AMD-V): This is crucial for better performance. You’ll need to enable this in your Mac’s BIOS settings. Look up instructions specific to your Mac’s model.
- Adjust Graphics Settings: If your VM is graphically intensive, consider allocating more video memory. You can do this in the VM’s settings.
- Use a Fast Storage Medium: If possible, use an SSD for your VM’s hard drive. This will significantly improve boot times and overall performance compared to using a traditional hard drive.
- Close Unnecessary Applications: Before running your VM, close any applications on your Mac that you don’t need. This frees up resources for the VM.
By following these steps and best practices, you’ll be well on your way to creating and running smoothly performing virtual machines on your Mac using VirtualBox.
Guest Operating System Configuration in VirtualBox on Mac
Okay, so you’ve got VirtualBox installed and a virtual machine created. Now comes the fun part: installing and setting up your guest operating system (like Windows or a Linux distro). This involves getting the OS installed, tweaking settings for optimal performance, and configuring how your VM connects to the network. Let’s dive in!
Installing a guest OS inside VirtualBox is pretty much like installing it on a regular computer, but with a few key differences. You’ll need an ISO image of your chosen operating system. This is usually a downloadable file from the OS vendor’s website. Once you have that, you’ll boot the VM from the ISO, follow the OS installer’s prompts, and—voila!—you’ll have a working guest OS.
Guest OS Installation Process
The specific steps will vary depending on the operating system you’re installing, but the general process is consistent. First, you’ll need to mount the ISO image of your chosen operating system within the VirtualBox VM settings. Then, start the VM. You should see the OS installer boot up. Follow the on-screen instructions to install the operating system, just like you would on a physical machine.
Remember to allocate sufficient disk space during the installation process. If you run into any errors during installation, consult the documentation for your specific OS. Common issues can involve insufficient disk space, incorrect ISO image, or driver incompatibility. Troubleshooting typically involves checking the VM’s settings, ensuring the ISO is correctly mounted, and checking the system requirements for your chosen OS.
Addressing Compatibility Issues
Sometimes, you might run into compatibility problems. For example, older guest operating systems might not have drivers that work perfectly with VirtualBox’s virtual hardware. This can lead to issues with graphics, networking, or other peripherals. The solution often involves updating the guest additions. These are a set of drivers and tools provided by VirtualBox to improve the guest OS’s performance and integration with the host.
Installing guest additions usually involves mounting another ISO image provided by VirtualBox within the running VM and running the installer. Another potential issue is hardware incompatibility, especially with graphics cards. If you encounter graphical glitches or performance problems, you might need to adjust the VM’s video memory settings or choose a different video controller type in the VM settings.
Network Configuration Options
VirtualBox offers three main network modes: NAT, Bridged, and Host-Only.
The choice depends on how you want your VM to interact with your network and the internet. Each mode has its own pros and cons, impacting security and accessibility.
- NAT (Network Address Translation): This is the default setting. Your VM gets an IP address within VirtualBox’s internal network, which is then translated to your host machine’s IP address when accessing the internet. It’s simple to set up and provides basic network access, but it hides the VM from other devices on your network.
- Bridged Networking: Your VM gets its own IP address directly from your host’s network, just like any other device on your network. This allows other devices to access the VM and vice-versa, but requires more network configuration knowledge.
- Host-Only Networking: This creates a private network between your VM and your host machine. It’s useful for testing network configurations without exposing your VM to the internet. This method is great for security-sensitive environments or internal testing.
To configure these settings, you’ll need to access the Network settings within the VM’s settings in VirtualBox. You can choose the desired network adapter type (NAT, Bridged, or Host-Only) and configure additional settings such as port forwarding (allowing access to specific ports on the VM from the outside world) as needed. The specific configuration steps will vary depending on the network mode you choose and the network configuration of your host machine.
VirtualBox Mac Shared Folders
Sharing files between your macOS host and your VirtualBox guest OS is super handy for development, data transfer, and general workflow efficiency. Setting up shared folders lets you access files directly from your guest OS without needing clunky workarounds like USB drives or network shares. This section will walk you through the process and highlight some important security considerations.Setting up shared folders involves configuring both your VirtualBox settings and the guest OS.
First, you’ll create a shared folder in VirtualBox’s settings, specifying a folder on your Mac that you want to share. Then, you’ll need to mount that shared folder within the guest OS using the appropriate tools for that operating system (e.g., using the VirtualBox Guest Additions). The process is generally straightforward but requires careful attention to permissions to prevent accidental data loss or security breaches.
Shared Folder Creation and Configuration
To create a shared folder, open VirtualBox, select your virtual machine, go to “Settings,” and then choose the “Shared Folders” section. Click the “+” button to add a new shared folder. You’ll need to provide a name for the shared folder (this is what you’ll see inside your guest OS), and then specify the path to the folder on your macOS system that you want to share.
It’s crucial to choose a folder that already exists on your Mac. You can also check the “Auto-mount” box to have the shared folder automatically mounted when the guest OS starts. After clicking “OK,” the shared folder will be created and ready to use in your guest OS.
Read/Write Permissions
After creating the shared folder, you’ll need to configure the read/write permissions within the guest OS. This is critical for data security. If you set the permissions to read-only, you can view files from the shared folder in the guest OS but won’t be able to modify or delete them. Conversely, read-write permissions allow for full access, enabling modification and deletion of files within the shared folder.
So, I’m running VirtualBox on my Mac, trying to record a tutorial. It’s pretty sweet for setting up different OSes, but for screen recording, I really need something robust. That’s where camtasia comes in; its editing features are way better than anything built into the VM. After I finish recording with Camtasia, I’ll shut down the VirtualBox instance to free up some RAM.
Back to my Mac!
The specific method for configuring these permissions will depend on the guest OS. For example, in Windows, you would adjust permissions through the file explorer’s properties; in Linux, you’d use the `chmod` command. Always remember to set permissions appropriately to prevent accidental data loss or unauthorized access. For instance, you might want read-only access for a shared folder containing sensitive project files to avoid accidental modifications from within the guest OS.
Security Considerations
Using shared folders introduces some security risks that need to be carefully considered. Because the shared folder directly connects your host and guest OS, any vulnerabilities in either system could potentially compromise the security of the other. Malicious software running within the guest OS could potentially access and modify files on your Mac through the shared folder. Similarly, vulnerabilities on your Mac could be exploited to gain unauthorized access to the shared folder and the guest OS.
Therefore, it’s essential to keep both your macOS system and your guest OS up-to-date with the latest security patches and antivirus software. Additionally, only share folders containing data you are comfortable being potentially accessible from your guest OS. Avoid sharing highly sensitive information, such as passwords or financial data, through shared folders. Using strong passwords and enabling appropriate firewalls on both systems is also a best practice.
VirtualBox Mac Virtual Machine Snapshots
VirtualBox snapshots are like a “save point” for your virtual machine (VM). They let you capture the exact state of your VM at a specific moment in time, allowing you to revert to that state later if something goes wrong. Think of it as a supercharged “undo” button for your entire virtual operating system. This is incredibly useful for testing software, experimenting with system configurations, or recovering from unexpected issues without losing all your work.Snapshots are crucial for minimizing risk when working with VMs.
They provide a safety net, allowing you to experiment freely knowing that you can easily return to a known good state if things go sideways. This is particularly valuable when testing potentially unstable software or making significant system changes. Without snapshots, a failed experiment could mean hours of lost work reinstalling and reconfiguring your VM.
Snapshot Creation, Management, and Deletion
Creating a snapshot is straightforward within VirtualBox’s GUI. You navigate to the VM’s settings, find the “Snapshots” section, and click “Take”. You’ll be prompted to give the snapshot a descriptive name (like “Before installing new drivers” or “After system update”). VirtualBox then creates a copy of the VM’s disk image at that precise moment. Managing snapshots involves viewing the list of existing snapshots, taking new ones, and deleting unnecessary ones.
This is all done through the same “Snapshots” section in the VM settings. Deleting a snapshot removes the saved state, reclaiming disk space. However, be cautious, as deleting a snapshot is permanent and cannot be undone. It’s always wise to keep a few snapshots representing key milestones in your VM’s development.
Comparing Snapshot Management Strategies
Several strategies exist for managing VM snapshots, each with its pros and cons. One approach is to frequently create snapshots, say, before every significant change. This maximizes the ability to revert but can consume considerable disk space. Conversely, a less frequent approach might involve taking snapshots only at major milestones (e.g., before installing a major application update).
This saves space but reduces the granularity of rollback options. A middle ground involves a combination of both: frequent snapshots for crucial changes and less frequent ones for less critical updates. The optimal strategy depends on your workload, available disk space, and tolerance for potential data loss. Consider factors like the frequency of your experiments and the size of your VM’s disk image when deciding on a strategy.
The Impact of Snapshots on Disk Space
Each snapshot consumes disk space proportional to the changes made since the previous snapshot. A snapshot taken immediately after creating a VM will be relatively small, while one taken after significant changes will be much larger. This means that frequent snapshots can lead to a substantial increase in disk space usage. Regularly deleting old or unnecessary snapshots is essential to manage this.
VirtualBox provides tools to view the size of each snapshot, allowing for informed decisions about which ones to keep or delete. Planning your snapshot strategy and regularly reviewing your snapshot usage is key to avoiding unexpected disk space issues.
VirtualBox Mac Extension Packs
VirtualBox extension packs add extra functionality to your VirtualBox installation, enhancing its capabilities beyond the core features. These packs are optional but can significantly improve your virtual machine experience, depending on your needs. Understanding what each pack offers and its potential impact is key to making informed decisions about your VirtualBox setup.
Available VirtualBox Extension Packs and Their Functionalities
Several extension packs are available, each providing a specific set of features. The availability and specific features might vary slightly depending on the VirtualBox version. However, the core functionalities remain consistent across releases.
Comparison of Extension Pack Benefits and Drawbacks
Installing extension packs generally offers significant benefits, but there are potential drawbacks to consider. Weighing these factors is crucial for determining which packs are right for your specific use case. For instance, the USB 3.0 support might be crucial for certain high-bandwidth devices, but it adds a dependency on a specific driver.
| Extension Pack Name | Key Features | Benefits | Drawbacks |
|---|---|---|---|
| Oracle VM VirtualBox Extension Pack | Support for USB 2.0/3.0 devices, VirtualBox RDP, PXE boot, and more. | Enhanced device support, improved remote access, easier network configuration. | Adds additional software; potential for conflicts with other drivers. Requires accepting a license agreement. |
| (No other officially supported extension packs as of current VirtualBox versions exist) | N/A | N/A | N/A |
VirtualBox Mac Networking Configurations
Networking your VirtualBox VMs on your Mac is crucial for accessing the internet, sharing files, and connecting to other devices on your network. Understanding the different network adapter types and how to configure them is key to a smooth virtual machine experience. This section will walk you through the various options and provide examples for common scenarios.
VirtualBox offers three primary network adapter types: NAT, Bridged, and Host-Only. Each provides a different level of isolation and connectivity to your host machine and the external network. Choosing the right adapter type depends heavily on your specific needs and how you intend to use your virtual machine.
NAT Network Adapter
NAT, or Network Address Translation, is the default network adapter type in VirtualBox. It provides a simple and secure way to connect your VM to the internet without directly exposing it to your host machine’s network. The host machine acts as a router, translating the VM’s network requests to the external network and vice-versa. This means your VM has internet access, but other devices on your network can’t directly access it.
This is ideal for security, especially when running untrusted software.
Example: A virtual machine running a web server for personal use. You want to access it from within the VM, and you need internet access to download updates. NAT would be perfect. Your external network is safe, as your VM isn’t directly exposed.
Bridged Network Adapter
A bridged adapter connects your VM directly to your physical network as if it were a separate physical machine. This means your VM has its own IP address on your network, just like any other device. Other devices on your network can access your VM, and vice-versa. This provides the most flexibility but also the least security.
Example: You’re running a virtual machine to test a network application. You need it to behave as if it were a separate device on your local network and be reachable by other machines. A bridged adapter would allow this. Your VM would appear as another device on your router’s DHCP client list.
Host-Only Network Adapter
A host-only adapter creates a virtual network that only your host machine and the VM can access. This provides a completely isolated network environment, perfect for testing or development purposes where you don’t want the VM to interact with the outside world. This setup doesn’t require an internet connection for the VM.
Example: You are developing a network application and want to test communication between multiple VMs without external interference. You would set up each VM with a host-only adapter, ensuring communication only between those VMs and your host.
Configuring Network Settings
To configure network settings, access the VM settings within VirtualBox. Navigate to the “Network” section. Select the adapter you wish to modify and choose the adapter type (NAT, Bridged, or Host-Only). Further options, such as specifying a specific IP address or subnet mask, can be adjusted based on your network’s requirements. Remember to consider your network’s configuration, especially if using a bridged adapter, to avoid IP address conflicts.
Troubleshooting Network Connectivity Problems
Network connectivity issues can stem from various causes. First, verify that the correct adapter type is selected and that the network settings are appropriate for your needs. Check the VM’s network configuration within the guest operating system to ensure that it’s correctly configured for the selected adapter type. If using a bridged adapter, ensure that the VM’s IP address doesn’t conflict with other devices on your network.
If using NAT, check your host machine’s internet connection. Consult your guest operating system’s documentation for further troubleshooting steps. Consider checking for firewall rules that may be blocking communication.
VirtualBox Mac Performance Optimization
So, you’ve got VirtualBox running on your Mac, but it’s feeling a little sluggish? Don’t worry, it’s a common issue. Optimizing your virtual machine’s performance involves tweaking a few settings and understanding how your Mac’s resources are being used. Let’s dive into some strategies to give your VMs a serious speed boost.Optimizing VirtualBox performance on macOS hinges on effectively allocating system resources and fine-tuning both the VirtualBox settings and the guest operating system configuration.
Insufficient RAM or CPU allocation can significantly hamper virtual machine responsiveness, leading to frustrating lag and slowdowns. Conversely, over-allocating resources can impact your host system’s performance. Finding the right balance is key.
RAM Allocation and its Impact on Performance, Virtualbox mac
The amount of RAM allocated to your virtual machine directly impacts its performance. If you assign too little RAM, the VM will constantly swap data to and from your hard drive, causing significant slowdowns. Imagine trying to run a marathon while constantly stopping to catch your breath – that’s your VM with insufficient RAM. A good rule of thumb is to allocate at least half of your Mac’s total RAM to the VM, but you might need more depending on the guest OS and the applications you’re running within it.
For example, a demanding application like a video editor will require more RAM than a simple web browser. Experiment to find the sweet spot that balances VM performance with your host system’s responsiveness. Observe your Mac’s activity monitor to check RAM usage.
CPU Core Allocation and its Effect on VM Responsiveness
Similar to RAM, the number of CPU cores allocated to your VM affects its processing power. Assigning more cores allows the VM to handle multiple tasks concurrently, leading to smoother performance. However, allocating too many cores can leave your host system resource-starved, impacting its performance. A good starting point is to allocate one or two cores, especially if you have a less powerful Mac.
Again, monitor your system’s performance to gauge the optimal number of cores. Running CPU-intensive applications inside the VM might necessitate allocating more cores. Observe the CPU usage in both the Activity Monitor (on macOS) and the Task Manager (in Windows) to monitor CPU utilization.
Guest Operating System Optimization
Optimizing the guest operating system itself can also significantly improve performance. This includes disabling unnecessary services and startup programs, ensuring the OS is up-to-date with performance patches, and using a lightweight desktop environment. For example, disabling visual effects and animations can improve responsiveness, particularly on older or less powerful VMs. Regularly uninstalling unused applications and clearing temporary files can also free up disk space and improve performance.
Consider using a lightweight distribution of Linux, if you are running Linux as a guest OS, for enhanced performance.
VirtualBox Mac USB Device Passthrough
Passing USB devices from your macOS host system to your VirtualBox guest operating system can be incredibly useful, allowing you to use devices like printers, cameras, or specialized controllers directly within the virtual machine. However, it’s not always a seamless process, and understanding the potential pitfalls is key to a successful setup.USB passthrough relies on VirtualBox’s ability to directly assign a physical USB device to the virtual machine, bypassing the host OS’s usual control.
This means the guest OS has complete control of the device, just as if it were physically connected. However, this direct access can sometimes lead to conflicts or instability if not configured properly.
USB Passthrough Configuration Steps
This process involves identifying the USB device, enabling passthrough in VirtualBox, and then connecting the device within the virtual machine. First, you’ll need to have VirtualBox installed and a virtual machine created. Then, follow these steps:
- Identify the USB Device: Before starting, find the device’s name in macOS System Information (found under About This Mac). You’ll need this name for the next step. For example, a specific webcam might be identified as “Logitech QuickCam Pro 9000”.
- Enable USB 2.0 (EHCI) Controller in VirtualBox: Navigate to your VM’s settings in VirtualBox. Under the “USB” section, ensure that at least one “USB 2.0 (EHCI) Controller” is enabled. This controller is necessary for USB passthrough to function correctly.
- Attach the USB Device: With the VM powered off, click the “USB” section again. Select the “Add” button. A list of connected USB devices will appear. Locate your target device using its name (identified in Step 1) and select it. Click “OK” to save the changes.
- Start the Virtual Machine: Power on your virtual machine. The USB device should now be available within the guest OS. The exact method of accessing the device within the guest OS will depend on the operating system installed in the VM (e.g., Windows, Linux).
- Troubleshooting: If the device isn’t recognized, double-check the device name and ensure the correct controller is enabled. You might need to restart both the VM and your Mac. Sometimes, USB 3.0 devices can be problematic; if you have trouble, try using a USB 2.0 device instead.
Potential Compatibility Issues and Troubleshooting
Not all USB devices are compatible with USB passthrough. Older or less common devices may not work correctly, even if the hardware is functioning on the host system. Additionally, certain USB devices might require specific drivers or configurations within the guest OS. If a device isn’t recognized, try installing the necessary drivers within the guest operating system.
If that doesn’t work, checking the device’s compatibility with VirtualBox and the guest OS is the next step. Sometimes, simply restarting both the host and guest OS can resolve temporary glitches.
Example of a Compatibility Issue and Solution
Let’s say you’re trying to pass through a specialized audio interface. The interface works perfectly on your Mac, but when passed through to the Windows VM, it isn’t recognized. The problem might be driver-related. The solution would involve finding and installing the correct drivers for the audio interface within the Windows VM. This often requires downloading the drivers from the manufacturer’s website.
Sometimes, a different USB controller within VirtualBox settings may also resolve the issue.
VirtualBox Mac Cloning and Exporting VMs
Cloning and exporting virtual machines (VMs) in VirtualBox are powerful tools for managing and sharing your virtual environments. Cloning creates a duplicate of an existing VM, while exporting packages the VM for transfer to another system. Understanding the differences between these operations is crucial for efficient VM management.
Virtual Machine Cloning
Cloning a VM in VirtualBox creates an exact copy of the original, including its operating system, applications, and data. This is useful for quickly creating a new VM with the same configuration as an existing one, without having to manually set up everything again. The cloned VM is independent of the original; changes made to one will not affect the other.
The process involves selecting the VM you wish to clone, choosing the “Clone” option from the menu, and then specifying the name and location for the new VM. VirtualBox will handle the duplication of all the necessary files. This process is relatively fast, as it’s essentially copying existing files.
Virtual Machine Exporting
Exporting a VM in VirtualBox packages the entire VM into a single, portable file (typically an OVA or OVF file). This allows you to easily move the VM to another computer, even one running a different operating system, provided VirtualBox is installed. The exported VM is self-contained, meaning it includes everything needed to run the VM, unlike a simple copy which may not include all necessary files.
Exporting is a more involved process than cloning, taking longer to complete, due to the compression and packaging of the entire virtual machine. The exported file can then be imported into another VirtualBox installation on a different system.
Differences Between Cloning and Exporting
Cloning and exporting serve different purposes. Cloning is ideal for creating a quick duplicate of a VM on the same system. Exporting is for transferring a VM to a different system. Cloning creates a new VM in the same location, while exporting creates a single file that can be moved and imported elsewhere. Cloning is faster and less resource-intensive than exporting.
Consider the scenario where you need a test environment: cloning is the better choice. If you need to move your VM to another computer, exporting is the way to go. The fundamental difference boils down to location: cloning duplicates within the same system, while exporting creates a transportable package.
VirtualBox Mac and macOS Security Considerations

Running virtual machines offers flexibility, but it also introduces potential security vulnerabilities. Understanding and mitigating these risks is crucial for maintaining the security of your macOS system and the virtual machines you host. Proper configuration and regular updates are key to minimizing your exposure.VirtualBox, like any virtualization software, acts as a bridge between your host operating system (macOS) and guest operating systems.
This creates potential attack vectors if not properly secured. A compromised guest OS could potentially compromise your host system, or vice-versa. Therefore, security best practices should be implemented at both the host and guest levels.
Guest Operating System Security Hardening
Securing your guest operating systems is paramount. This includes strong passwords, regular updates, and the installation of robust security software like antivirus and firewalls. Consider using a dedicated, non-administrator account for daily tasks within the guest OS to limit the potential damage from a compromise. Regularly scanning for malware and promptly addressing any vulnerabilities is essential. Enabling automatic updates for the guest OS is highly recommended to patch security holes as soon as they’re discovered.
Host Operating System Security Measures
Your macOS system also requires attention. Ensure your macOS system is up-to-date with the latest security patches. This includes regularly updating macOS itself, as well as all other applications, including VirtualBox. Using a strong, unique password for your macOS user account and enabling features like FileVault (full-disk encryption) further enhances security. Consider using a robust antivirus solution for your macOS system, as additional protection.
VirtualBox Security Best Practices
Keeping VirtualBox itself updated is crucial. Regularly check for and install updates to benefit from the latest security patches and bug fixes. Avoid downloading VirtualBox from unofficial sources. Only download from the official Oracle website to ensure you’re not installing malware. Carefully consider the network configuration of your virtual machines.
Restrict network access where possible, and avoid exposing virtual machines directly to the internet unless absolutely necessary.
Mitigation Strategies for Potential Risks
Potential risks include malware infections spreading between the host and guest, unauthorized access to virtual machines, and vulnerabilities in VirtualBox itself. Mitigation strategies involve using strong passwords, enabling encryption, regularly updating software, and employing robust security software on both the host and guest operating systems. Regularly backing up your virtual machine data is crucial to recover from potential data loss or corruption.
Implementing strong access controls, including restricting access to the virtual machine files, further mitigates risks. Network segmentation, where feasible, can also isolate virtual machines from potentially hostile networks.
Importance of Regular Updates
Regularly updating both VirtualBox and your guest operating systems is arguably the single most important security practice. Software updates often include critical security patches that address known vulnerabilities. Ignoring updates leaves your systems vulnerable to exploitation. Scheduling automatic updates for both VirtualBox and your guest operating systems ensures that your security posture remains strong and up-to-date. A proactive approach to updates significantly reduces your overall risk profile.
Last Recap
So there you have it – a comprehensive look at using VirtualBox on your Mac. From the initial installation to advanced techniques like VM cloning and security considerations, we’ve covered a lot of ground. Remember, mastering virtualization takes practice, but with this guide as your roadmap, you’ll be up and running virtual machines in no time. Now go forth and experiment – the possibilities are endless!
FAQ Compilation
Can I run demanding games within a VirtualBox VM on my Mac?
Probably not smoothly. Virtualization introduces overhead, so performance will be significantly lower than running the game directly on your Mac’s hardware. Resource allocation (RAM and CPU cores) is crucial here; even with optimal settings, demanding games may struggle.
What are the system requirements for running VirtualBox on a Mac?
VirtualBox’s system requirements are relatively modest, but performance depends on your Mac’s specs. Generally, you’ll need a reasonably modern Mac with sufficient RAM (at least 4GB, but more is better) and a decent processor. Check the official VirtualBox website for the most up-to-date requirements.
Is it safe to install VirtualBox on my Mac?
VirtualBox itself is generally safe when downloaded from the official Oracle website. However, always exercise caution when installing guest operating systems within the VM, as malware risks exist just as they would on a physical machine. Keep your antivirus software up-to-date and practice safe computing habits.
How much hard drive space should I allocate to a virtual machine?
This depends entirely on the guest operating system and its intended use. A basic Windows installation might need 30-50GB, while a more demanding setup or one with lots of applications could require 100GB or more. Allocate more space than you think you’ll need; it’s easier to expand later than to shrink.