DIY dog obstacle courses offer a fantastic way to engage your furry friend in both physical and mental stimulation. Building your own course allows for customization, cost-effectiveness, and bonding opportunities, all while ensuring your dog gets the exercise and entertainment they crave.
Imagine a world where your dog’s tail wags with excitement as they navigate through tunnels, leap over hurdles, and weave through poles. These engaging activities not only provide physical fitness but also mental challenges that keep your canine companion happy and healthy.
Basic Obstacle Ideas

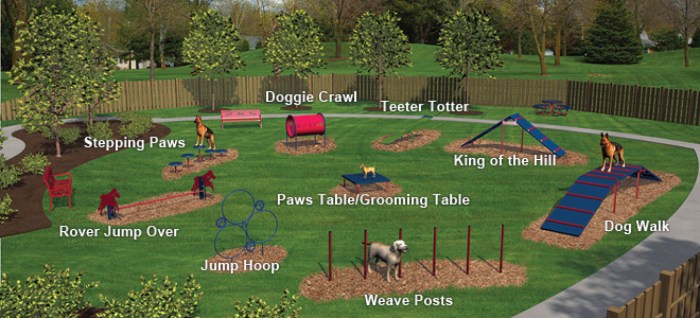
This section will explore a variety of basic obstacle ideas that can be incorporated into your DIY dog obstacle course. We will discuss tunnels, jumps, weave poles, and ramps, providing detailed instructions and illustrations for construction, while emphasizing safety considerations. We will also explore the benefits of each obstacle type for dog training and engagement.
Tunnels
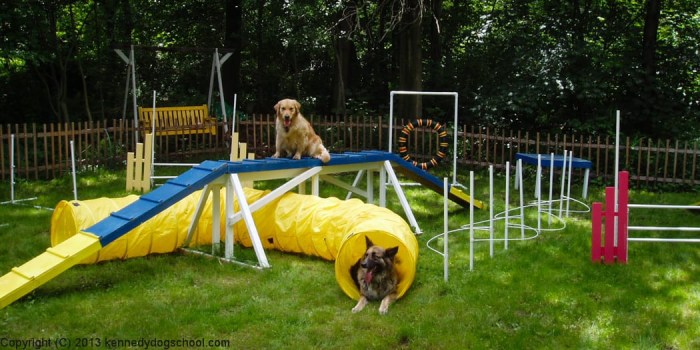
Tunnels are a great way to encourage your dog’s natural instinct to explore and navigate. They can also help to build confidence and improve their ability to focus in a confined space.
Construction
- A simple tunnel can be made from a large cardboard box or PVC pipe.
- For a cardboard tunnel, simply cut two large openings on opposite ends of the box. Ensure the openings are large enough for your dog to comfortably enter and exit.
- For a PVC tunnel, connect several sections of PVC pipe together using PVC glue. The diameter of the pipe should be large enough for your dog to move through comfortably.
- You can also purchase pre-made tunnels from pet supply stores.
Safety Considerations
- Make sure the tunnel is sturdy and will not collapse on your dog.
- Ensure the tunnel is well-ventilated, especially if using a cardboard box.
- Supervise your dog while they are using the tunnel, especially if they are new to it.
Benefits
- Encourages exploration and navigation.
- Builds confidence and focus.
- Provides mental and physical stimulation.
Jumps
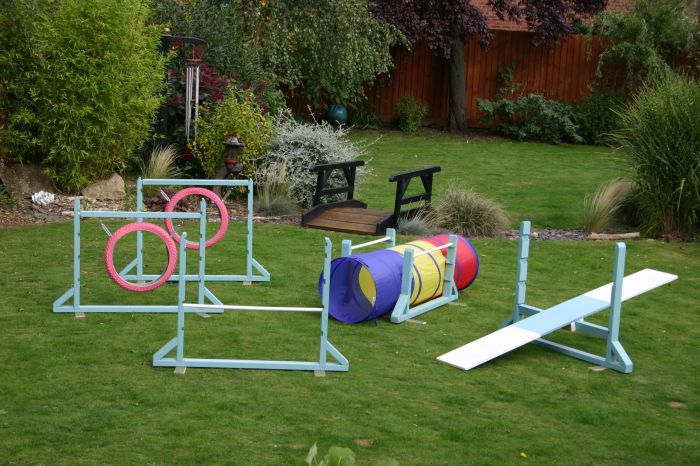
Jumps are an essential part of any obstacle course, and they provide a great way to build your dog’s strength, agility, and coordination.
Construction
- A simple jump can be made from two wooden planks and a piece of plywood or a sturdy fabric material for the top.
- The planks should be spaced apart to create the desired height of the jump.
- The plywood or fabric should be secured to the planks using screws or staples.
- You can also purchase pre-made jumps from pet supply stores.
Safety Considerations
- Make sure the jump is sturdy and will not collapse when your dog lands on it.
- Ensure the jump is the appropriate height for your dog. Start with a low jump and gradually increase the height as your dog becomes more confident.
- Use a soft landing surface, such as grass or a mat, to prevent injuries.
Benefits
Weave Poles
Weave poles are a challenging obstacle that requires your dog to navigate a series of poles in a serpentine pattern. They are great for improving your dog’s agility, coordination, and focus.
Construction
- Weave poles can be made from PVC pipe, metal rods, or even wooden dowels.
- The poles should be spaced about 2 feet apart and placed in a straight line.
- You can use stakes or heavy objects to secure the poles in place.
- You can also purchase pre-made weave pole sets from pet supply stores.
Safety Considerations
- Make sure the poles are sturdy and will not fall over when your dog is weaving through them.
- Ensure the poles are spaced appropriately for your dog’s size and agility.
- Start with a shorter set of poles and gradually increase the length as your dog becomes more confident.
Benefits
- Improves agility, coordination, and focus.
- Encourages quick reflexes and precision.
- Provides mental and physical stimulation.
Ramps
Ramps are a great way to challenge your dog’s ability to climb and descend. They can also help to build their confidence and improve their coordination.
Construction
- A simple ramp can be made from plywood or a sturdy piece of wood.
- Cut the wood to the desired length and width of the ramp.
- Use screws or nails to attach the ramp to a stable base, such as a wooden platform.
- Ensure the ramp is sturdy and will not slide or tip over.
- You can also purchase pre-made ramps from pet supply stores.
Safety Considerations
- Make sure the ramp is sturdy and will not collapse when your dog is climbing or descending it.
- Ensure the ramp is the appropriate length and angle for your dog’s size and agility.
- Use a non-slip surface on the ramp to prevent your dog from slipping.
Benefits
- Challenges your dog’s ability to climb and descend.
- Builds confidence and coordination.
- Provides mental and physical stimulation.
Safety Considerations

Building and using a DIY dog obstacle course is a fun and rewarding experience for both you and your furry friend. However, safety should always be a top priority. By taking precautions and following these guidelines, you can ensure a safe and enjoyable experience for everyone involved.
Choosing Safe Materials
Using non-toxic materials is crucial for your dog’s safety. Avoid materials that could be harmful if ingested or that might cause skin irritation.
- Wood: Opt for untreated, non-toxic wood, free of splinters or sharp edges. You can also use pressure-treated lumber, but make sure it’s specifically designed for pet use and doesn’t contain arsenic or other harmful chemicals.
- Plastic: Choose durable, non-toxic plastic, free of BPA and phthalates. Avoid plastic that is easily breakable, as it can pose a choking hazard.
- Metal: If using metal, ensure it is smooth and free of sharp edges or protruding parts. Avoid using galvanized metal, as it can be toxic to dogs.
Securing Obstacles, Diy dog obstacle course
Properly securing obstacles is essential to prevent them from tipping over or collapsing during use.
- Stability: Use heavy-duty materials and secure connections to ensure stability. Consider using anchors or weights to further stabilize larger or taller obstacles.
- Sturdy Construction: Use strong fasteners like screws or bolts to create robust connections. Avoid using nails, which can easily pull out and pose a safety risk.
- Testing: Before allowing your dog to use the course, test each obstacle for stability and strength. Make sure they can withstand the weight and force of your dog’s play.
Supervision and Monitoring
Constant supervision is crucial during playtime. Keep a watchful eye on your dog, and be prepared to intervene if necessary.
- Know Your Dog: Consider your dog’s age, size, and physical limitations. Don’t force them to attempt obstacles they might not be comfortable with.
- Start Simple: Introduce obstacles gradually, starting with easier ones and gradually progressing to more challenging ones as your dog gains confidence and agility.
- Look for Signs of Distress: Be aware of signs of discomfort or stress, such as panting excessively, whining, or avoiding an obstacle. If you notice any of these signs, stop the activity and allow your dog to rest.
Preventing Injuries
Taking steps to prevent injuries is crucial for both you and your dog.
- Clear the Area: Before setting up the course, ensure the area is free of debris, sharp objects, and other hazards.
- Soft Landing Zones: Provide soft landing zones around obstacles, especially those involving jumps or heights. You can use mats, blankets, or even a layer of soft soil.
- First Aid Kit: Keep a basic first aid kit readily available in case of minor injuries. This should include items like antiseptic wipes, bandages, and a pair of tweezers.
Adapting for Different Dog Sizes: Diy Dog Obstacle Course

Creating an obstacle course that’s fun and safe for all dogs requires considering their individual sizes and abilities. You can adjust the height, width, and difficulty of obstacles to make the course suitable for tiny Chihuahuas to towering Great Danes.
Adjusting Obstacle Heights
The height of obstacles is crucial for safety and enjoyment. For smaller dogs, obstacles should be low enough to allow them to jump over or crawl under comfortably. Taller dogs, on the other hand, need obstacles that are high enough to provide a challenge but not so high that they risk injury.
Here are some tips for adjusting obstacle heights:
- Use adjustable obstacles: Many commercially available obstacles are adjustable in height, allowing you to customize them to suit your dog’s size.
- Create different levels: Offer multiple levels of each obstacle, allowing dogs to choose the one that’s right for them. For example, you could have a tunnel with two entrances, one low and one high.
- Use ramps: Ramps can help smaller dogs access higher obstacles, while also providing a safe alternative for dogs who are hesitant to jump.
- Consider the dog’s jumping ability: Even if a dog is large, it might not be a strong jumper. Observe your dog’s jumping ability and adjust obstacle heights accordingly.
Adjusting Obstacle Widths
The width of obstacles is important for ensuring that all dogs can navigate them safely. Narrow obstacles can be challenging for larger dogs, while wide obstacles might be overwhelming for smaller dogs.
Here are some tips for adjusting obstacle widths:
- Use different sized tunnels: Offer tunnels with varying widths to cater to different dog sizes.
- Create multiple paths: Provide alternative paths around obstacles, allowing dogs to choose the route that’s most comfortable for them.
- Use wider planks for balance beams: Wider planks provide a more stable surface for larger dogs, while narrower planks can challenge smaller dogs.
- Consider the dog’s agility: Some dogs are naturally more agile than others. Adjust obstacle widths to match your dog’s individual agility level.
Adjusting Obstacle Difficulty
The difficulty of obstacles can be adjusted by changing their design, height, or width. For example, a simple weave pole course can be made more challenging by adding more poles or increasing the distance between them.
Here are some tips for adjusting obstacle difficulty:
- Start simple: Begin with easy obstacles and gradually introduce more challenging ones as your dog becomes more confident.
- Use positive reinforcement: Reward your dog for successfully completing obstacles, even if they make mistakes. This will help them stay motivated and confident.
- Let your dog guide you: Observe your dog’s reactions to different obstacles. If they seem hesitant or uncomfortable, adjust the obstacle accordingly.
Creating a Safe and Enjoyable Experience
The most important thing is to create an obstacle course that is safe and enjoyable for all dogs. By carefully considering the size and abilities of your dog, you can create a course that will challenge them, entertain them, and help them build confidence.
Here are some additional tips for creating a safe and enjoyable experience:
- Use soft, padded materials: Choose soft materials for obstacles like jumps and tunnels to minimize the risk of injury.
- Provide clear boundaries: Mark the boundaries of the course with cones or other visible markers to help dogs stay on track.
- Offer plenty of breaks: Allow dogs to take breaks as needed, especially if they are getting tired or frustrated.
- Keep it fun: The goal is to create a positive experience for your dog, so make sure the course is fun and engaging.
Creating a DIY dog obstacle course is a rewarding project that strengthens the bond between you and your dog. By thoughtfully designing and building your course, you can provide a safe and stimulating environment for your pup to thrive. Remember, with a little creativity and some basic materials, you can transform your backyard into an exciting adventure playground for your four-legged friend.
Building a DIY dog obstacle course is a fun and rewarding project, especially if you have a playful pup who loves to run and jump. You can use everyday items like cardboard boxes, tunnels, and even old tires to create a challenging course. Just remember, safety first! If you have a dog with joint pain, you might want to consider consulting with your veterinarian about options like evista to help manage their discomfort.
Once you’ve got the course set up, it’s time for some serious fun!

